How to Remove Tile Flooring the Right Way
Tile removal looks simple until the first piece refuses to budge and the job turns into dust, noise, and broken thinset stuck like concrete. If you are researching how to remove tile flooring, the real question is not just how to break tile. It is how to remove it without damaging the subfloor, delaying the next phase, or turning a one-day project into a week of repairs.
That is where a professional approach matters. Whether you are updating a dated kitchen, replacing cracked bathroom tile, or preparing an investment property for new flooring, the removal phase sets the tone for everything that follows. Fast demolition is helpful, but clean demolition is what protects the schedule and the budget.
How to remove tile flooring without creating bigger problems
The first step is knowing what is under the tile. Ceramic and porcelain tile are usually installed over concrete backer board, mortar, or directly on a concrete slab. In older homes, you may also find mud beds, multiple flooring layers, or patched areas that were never properly leveled. Each of these conditions changes the difficulty of removal.
Before any demolition starts, the room needs to be cleared and protected. Appliances, vanities, trim, doors, and nearby finished surfaces can all be affected by flying debris and vibration. Dust control is also a serious issue, especially in occupied homes or commercial spaces. Plastic containment, proper ventilation, and the right PPE are not optional if you want the work done safely.
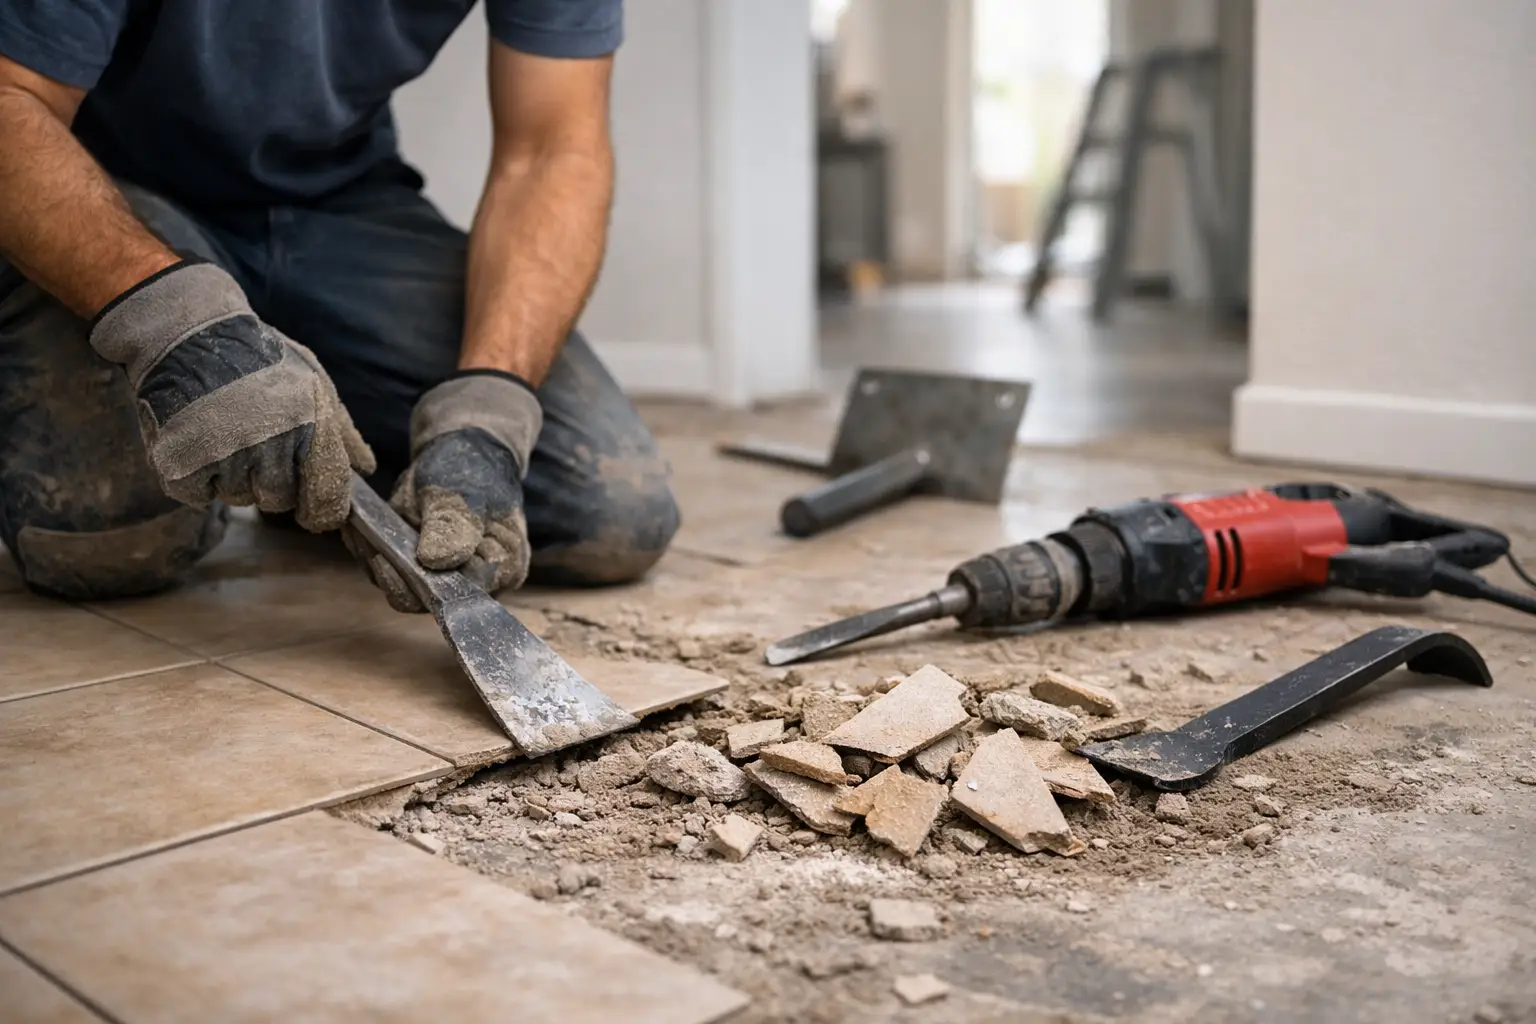
Once the area is ready, the tile has to be loosened from a starting point. In some rooms, a damaged tile, doorway edge, floor vent, or transition strip provides that opening. From there, a pry bar, hammer, or demolition hammer with a chisel attachment can be used to lift sections of tile. On small jobs, hand tools may be enough. On larger jobs, power equipment usually makes more sense because it saves hours of labor and reduces strain.
The trade-off is control. Aggressive tools can remove tile quickly, but they can also gouge the subfloor or crack surrounding finishes if used carelessly. That is why experience matters more than force. The goal is not only to remove the surface material. The goal is to leave a sound base for the next installation.
What tools are usually needed
If you plan to tackle the job yourself, the basic tool list is straightforward. Most tile removal projects involve a hammer, floor scraper, pry bar, cold chisel, heavy-duty trash containers, gloves, eye protection, hearing protection, knee pads, and a dust mask or respirator. For tougher installations, a rotary hammer or demolition hammer is often necessary.
The thinset or mortar left behind is where many DIY projects slow down. Removing tile is only half the job. If the floor still has hardened adhesive ridges across the surface, new flooring cannot go down properly. That cleanup phase may require a floor grinder, scraper blade, or patching compound, depending on the condition of the substrate.
This is also where cost calculations change. Renting the right equipment can help, but once you add tools, disposal fees, and time, a professional crew often becomes the more efficient option, especially when speed matters.
The step-by-step process
In most cases, how to remove tile flooring comes down to five stages: preparation, break-up, lifting, adhesive removal, and subfloor inspection. Skipping any one of them usually creates problems later.
Preparation starts with shutting off water if plumbing fixtures are involved, disconnecting appliances if needed, and protecting adjacent rooms. Baseboards and trim may need to be removed carefully if they will be reused.
The demolition phase begins at the easiest access point. Tiles are broken and lifted section by section. Some come up cleanly. Others shatter into small pieces and separate from the backing unevenly. It depends on the tile type, the installer’s method, and how strong the bond is.
After the tile is gone, the remaining mortar or underlayment has to be removed. On concrete, that often means scraping and grinding. On wood subfloors, the process has to be more controlled. Excessive force can splinter plywood, weaken seams, or expose hidden moisture damage.
Then comes inspection. A floor may look ready at first glance, but tile removal often reveals cracks, soft spots, water damage, uneven transitions, or old patchwork repairs. If you are installing new tile, luxury vinyl, or marble, the floor needs to meet the flatness and stability requirements for that material. Premium finishes only perform as well as the surface below them.
Common issues that show up after tile removal
One of the biggest surprises for property owners is how often removal uncovers subfloor problems. Bathrooms may have hidden water damage around the toilet or tub. Kitchens may show old leaks near the dishwasher or sink line. In rental properties and older homes, it is not unusual to find one flooring material installed over another, with uneven layers built up over time.
Another common issue is cracked concrete. Not every crack is a major structural concern, but it does need to be evaluated before the new floor goes in. If the surface is not properly repaired and prepared, the new installation may fail early, especially with rigid materials like tile and stone.
There is also the question of noise and dust. Tile demolition is disruptive. In occupied spaces, timing matters. For homeowners, that may mean planning around family routines. For property managers and commercial clients, it may mean coordinating access, minimizing downtime, and keeping adjacent areas usable.
DIY or hire a professional?
It depends on the size of the job, the material underneath, and how much risk you can afford. A small powder room with loose tile over a solid base is one thing. A large open-plan area with bonded porcelain over concrete is something else entirely.
DIY can work if you have the right tools, realistic expectations, and time to handle disposal and cleanup. But if the project needs to stay on schedule, if the floor has to be installation-ready, or if the property is occupied, professional removal usually delivers better value. You are not just paying for demolition. You are paying for speed, cleaner execution, and fewer surprises before the next trade arrives.
That is especially true when the same team can handle removal, surface prep, and new floor installation. Keeping those phases under one roof reduces delays and avoids the common finger-pointing that happens when one contractor blames another for floor issues.
When professional tile removal makes the most sense
If the tile extends under cabinets, around plumbing fixtures, or into multiple connected rooms, the work gets more technical. If the finish material going back is high-end, the prep has to be exact. If you are turning over a property quickly, labor efficiency matters just as much as labor cost.
For homeowners and investors in Central Florida, that often means choosing a crew that understands both demolition and what comes next. Rox Floor approaches tile removal as the first phase of a complete flooring result, not as a rough tear-out done in isolation. That mindset helps protect the subfloor, streamline the schedule, and improve the final finish.
What happens after the tile is removed
Once demolition is complete, the focus shifts to surface preparation. This is where quality jobs separate themselves from rushed ones. The floor may need grinding, patching, leveling, moisture checks, or minor repairs before any new material is installed.
If the next step is ceramic or porcelain tile, the surface needs to be stable and flat. If the plan is vinyl plank, transitions and smoothness become even more noticeable. If marble is going in, there is very little room for error. Every premium installation starts with disciplined prep work.
Disposal is the last practical piece. Broken tile is heavy, sharp, and messy. Hauling it out safely takes planning, especially in upper-floor units, occupied homes, or commercial spaces with limited access. Professional crews are set up for that from the start, which keeps the site cleaner and the project moving.
Removing tile is not glamorous work, but it is one of the most important steps in any renovation. Done right, it clears the way for a better floor, a cleaner install, and fewer expensive corrections later. If you are planning a remodel, think beyond demolition day. The best results come from treating removal as part of the finish, not separate from it.